



photo q1_zpscd9da648.png  photo dot_zpsb8876eec.png  photo q2_zps95da3dae.png  photo dot_zpsb8876eec.png  photo q3_zps747c53f9.png  photo dot_zpsb8876eec.png  photo q6_zps32c3ba5d.png  photo dot_zpsb8876eec.png  photo q4_zpse6214d9c.png  photo dot_zpsb8876eec.png  photo q5_zps8a7bdd1d.png

Thursday, 31 December 2020

Laureate Quilt Illuminated Alphabet - Free Patterns


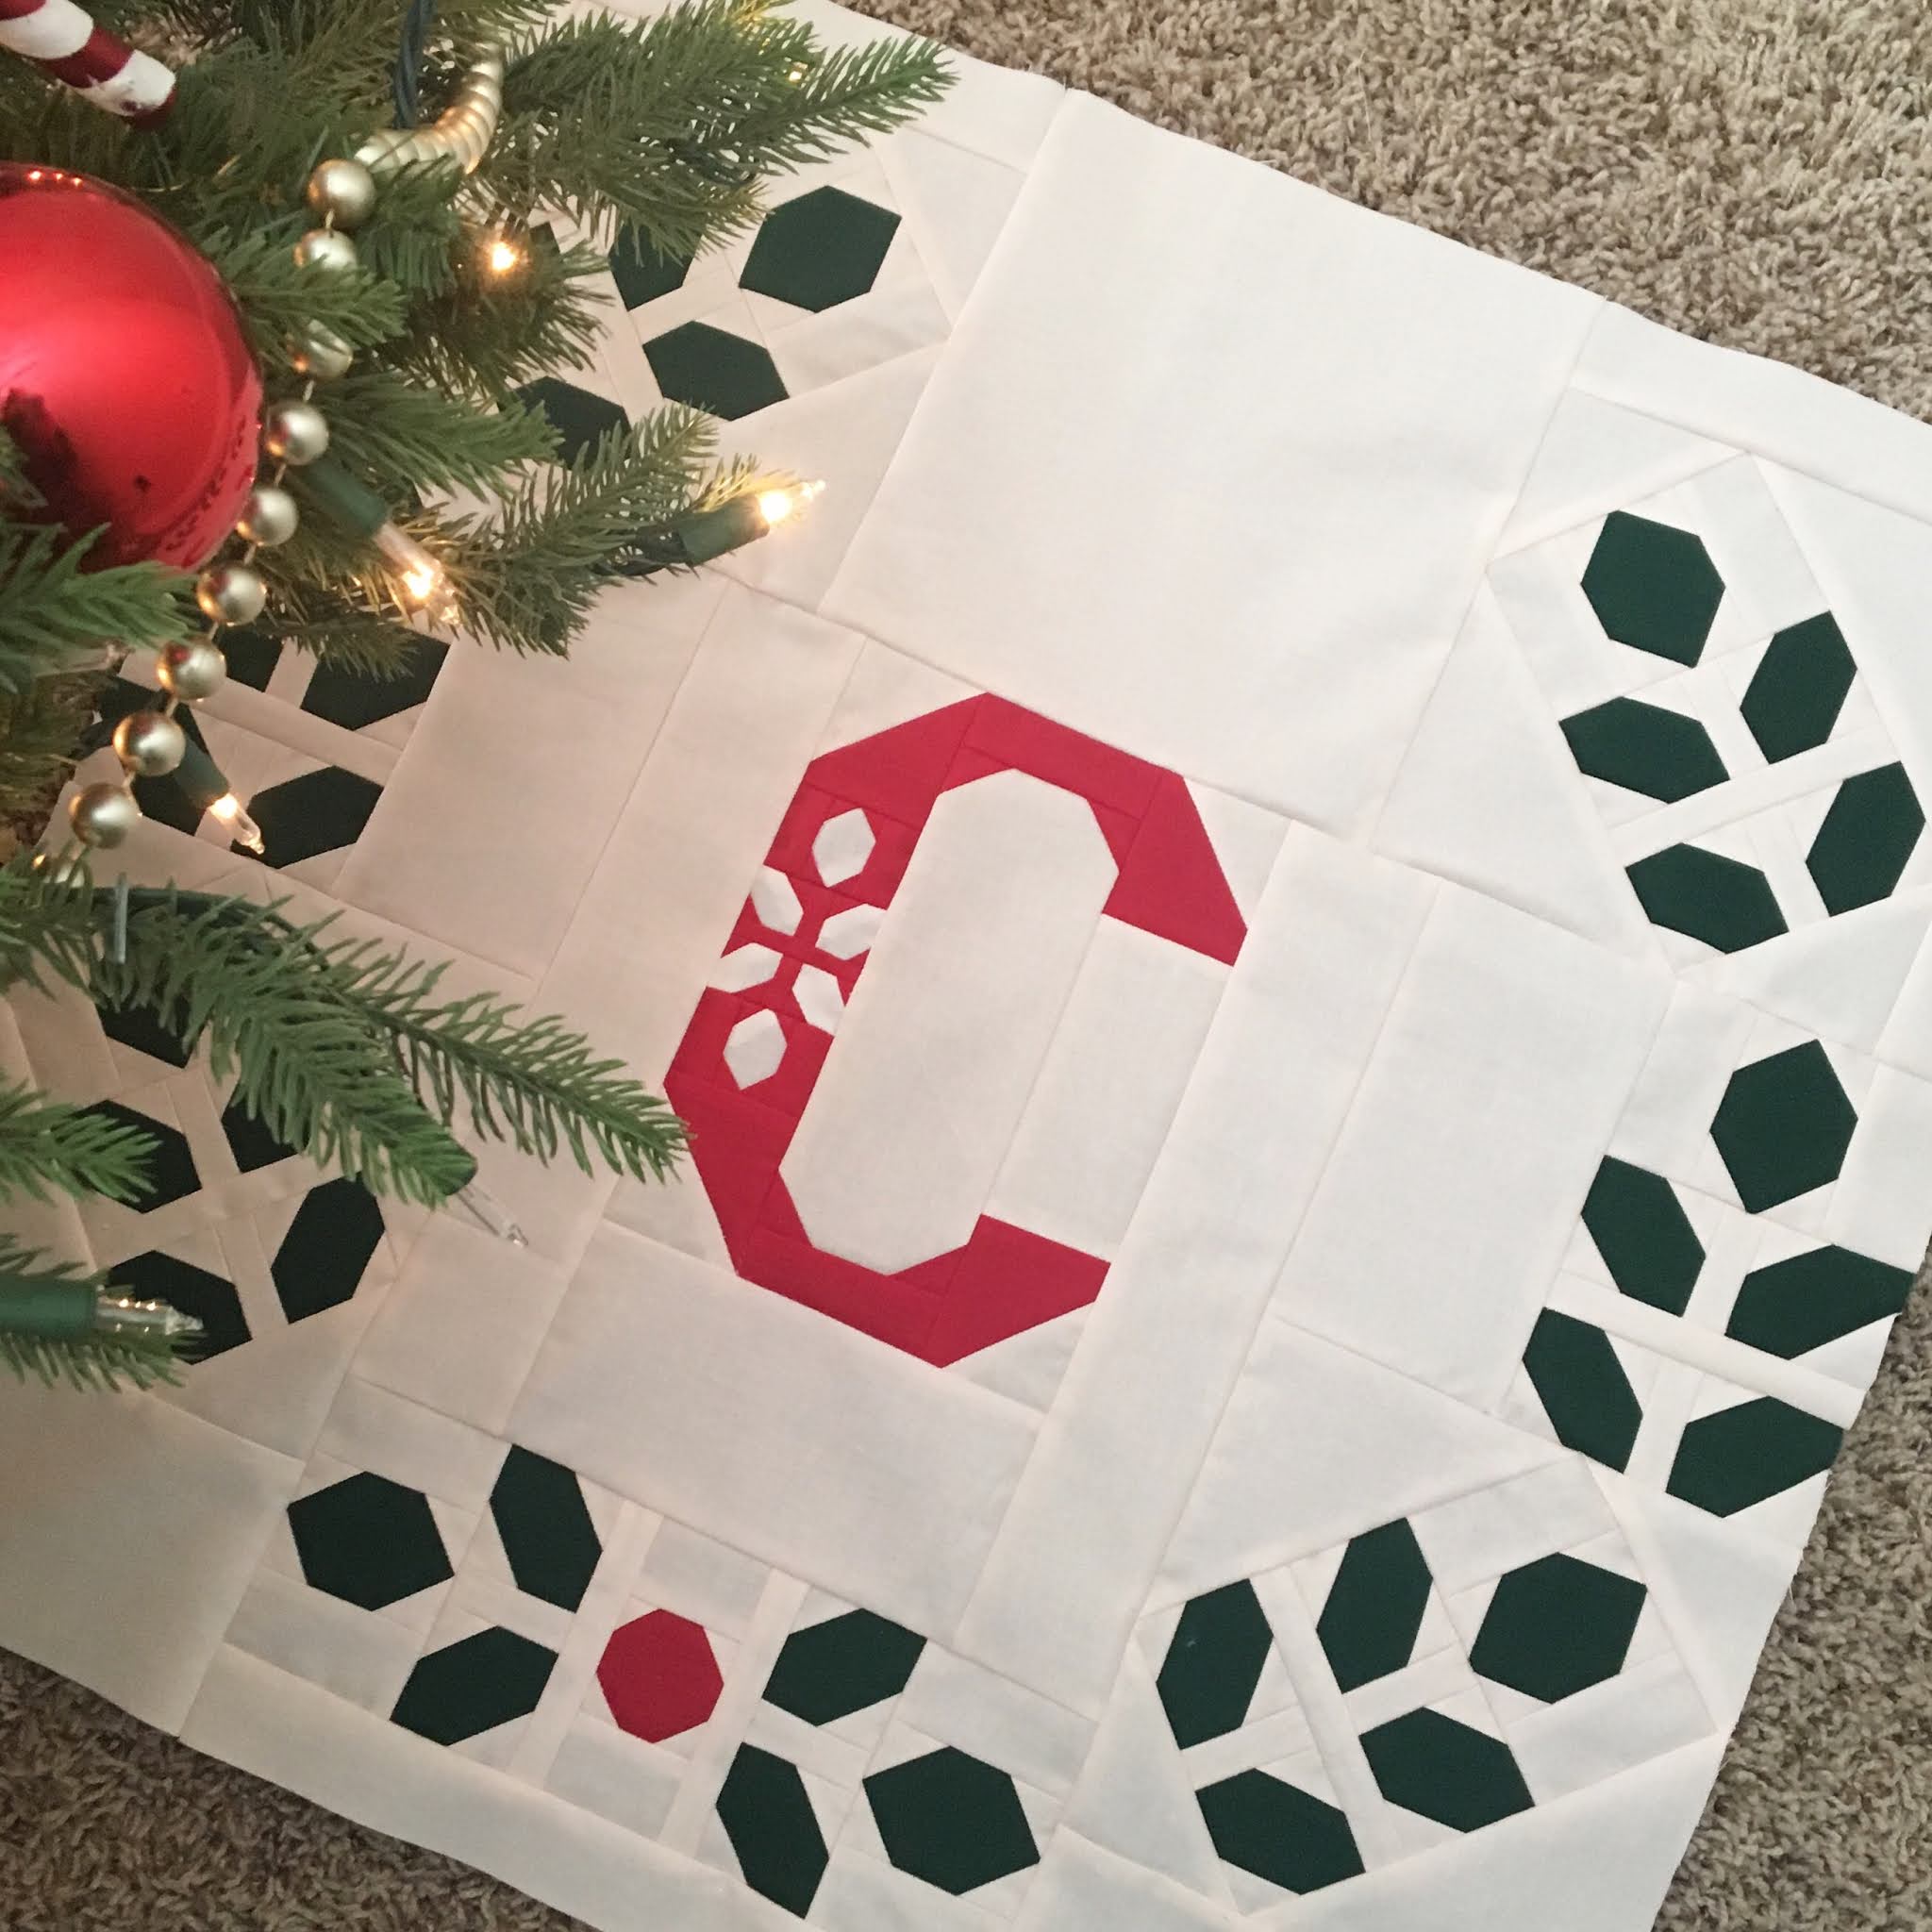
Hello everyone, I have something cute to share with you today. I've been working (day and night!) on designing this alphabet for you to use with your Laureate Quilt and all the letters are free!!  I've been trying to knock out as many as possible, and will continue to add to this page until they are all complete. When I originally thought about designing these letters I talked myself out of it because it was overwhelming to design an entire alphabet. But when you start to really think about it, a lot of the letters have the same shapes, so I started to work my way through them by starting with similar looking letters.

The pic above shows the block in Christmas colors, but my plan is to show you soon another in beautiful spring colors. 

Included is the supplemental instructions you will need to put them in your wreath block if you choose. Each of the blocks is 8 1/2" and they look so cute inside the wreath with the continuation of the leafy theme. If you would rather make a plain letter instead of making the leaves, you can just subsitute the "stem" with a 2 1/4" x 8 1/2" rectangle. 

I'm calling these letters "Illuminated" because they remind me of the old, beautiful drop cap or initials used in books and illuminated manuscripts. 

Keep checking back here or on instagram @prettylittlequilts to see what new letters I add if you're looking for a specific one. You can always send me a message at cristina@prettylittlequilts.com, or leave a reply below, to let me know if there's one in particular you want to use, and I'll make it a priority.

To download the pattern, click on the link below:

Illuminated Letter - A

Illuminated Letter - B

Illuminated Letter - C

Illuminated Letter - D

Illuminated Letter - E

Illuminated Letter - F

Illuminated Letter - G

Illuminated Letter - H

Illuminated Letter - I

Illuminated Letter - J

Illuminated Letter - K

Illuminated Letter - L

Illuminated Letter - M

Illuminated Letter - N

Illuminated Letter - O

Illuminated Letter - P

Illuminated Letter - Q

Illuminated Letter - R

Illuminated Letter - S

Illuminated Letter - T

Illuminated Letter - U

Illuminated Letter - V

Illuminated Letter - W

Illuminated Letter - X

Illuminated Letter - Y

Illuminated Letter - Z

Although I do my very best to insure there are no typos or mistakes, sometimes mistakes happen. Please let me know if you find one. Thank you!! 

To purchase a copy of the Laureate Quilt Pattern click here. 

Wednesday, 9 December 2020

New Pattern and a Giveaway!!


Today I released a new pattern, Laureate, and I'm doing a Giveaway on Instagram @prettylittlequilts. Head on over, and you could win a pattern (in the format of your choice) for you and a friend! Winners will be randomly selected on Friday. 

I got the idea for this pattern after taking a classical architecture class at the American College of Building Arts. Although wreaths have never gone out of style, it was my first time really appreciating the history and beauty of the wreath. 

The quilt is 83" x 83" and features three different styles of wreaths. Each wreath block is 23 1/2 (unfinished), and one block could make a beautiful wall hanging or used for a large Euro pillow sham. Even though the blocks are large, I really put a lot of thought into the size, and made several different test sizes. I wanted to stay within 1/4" increments, and wanted the white space between the leaves to stay proportional, and this seemed to be the perfect size where the pieces didn't get too small, and the white space still made sense. 

I started this pattern back in the summer, and worked with Lindsie at Lindsie Bergevin Studio who designed a new logo and helped me get the pattern looking like I imagined. She was wonderful to work with, and really took the time to understand my wishes and style. I recommend her for any of your graphic design needs--just don't take all of her time. She doesn't know this, but I made her my new best friend:) 

I also have to thank Gwen, who owns the quilt shop Tillalili who helped make sure that my instructions made sense, and gave me suggestions when she thought there was a better way to piece things. Her experience and willingness to help was such a blessing and really helped improve my pattern. 

Overall, taking the pattern from branding to production took a lot of help to from several people to make this dream of mine come true. I am just grateful for the friends and family who have supported me, and helped me on this road. Even though this year has been horrible in so many ways, I accomplished this goal, and I'm really happy about that. 

To get your copy of the pattern, click here and it will take you to my Etsy shop. I have PDF available immediately, and taking pre-orders for paper patterns! Hope you have a wonderful week. 


Tuesday, 18 August 2020

I Heart America Block Pattern


I heart america

Sadly, when Bluprint went down, my "I Heart America" pattern went with it. But good news! You can download the "I Heart America" pattern block here. And in other good news, they are planning on relaunching the website Sept 1. You can read more about that here. 

The block is a 12.5" square (unfinished) and you can see all the cute things people are making under the #iheartamerica hashtag on instagram here. 

I heart america 2 


 For your free PDF download of the I Heart America pattern click here. 


Enjoy!


Monday, 18 July 2016

I Heard the Bells on Christmas Day: Pixie Noel Blog Hop

Hi Y'all. I'm so excited today to be part of the Pixie Noel Blog Hop. I have been a fan of Tasha Horsley's fabrics for such a long time, and I'm excited to share with you what I made with her latest collection, Pixie Noel. These fabrics are just so cute and festive--it's impossible not to get into the Christmas spirit!!

bell block 2


When I thought about what I wanted to make, I thought it really be cool to design a cute block that could be used for many different types of projects. I spent a couple of days thinking about Christmas themes, and it was a reminder (that comes up every Christmas) that I don't have "a thing". What I mean by that is, I don't collect snow globes, or nutcrackers, or santa figurines. I have a hodgepodge of a bunch of different things, but I've never settled on what was going to be my thing--and that's always bothered me! Well, something that kept popping up over-and-over in my head was my favorite holiday movie "It's a Wonderful Life". That movie is not only just my favorite Christmas movie, it's one of my favorite movie ever. And if you've seen the movie you are familiar with Zuzu's line, "Every time a bell rings, and angel gets it's wings". So, I decided. The bell. That's going to be my thing. What's prettier than the sound of a church bell, or sleigh bells, or the dinner bell? And if you've seen the Polar Express, you know how important it is to be able to hear the bells ringing. And how many Christmas songs can you think of that refer to bells?


This block is 9.5in x 7.5in, but for mine, I added an additional 1.5in border around the bottom and sides, because I knew I wanted to make separate mini-quilts. With the borders the block is 10.5in x 9.5in. To make my blocks, I cut all the pieces for the bell and background from each fat quarter (one fat quarter is enough to make two blocks) and then I mixed and matched the fabrics. I think it would be really cute incorporated into a sampler quilt, or it would make a really cute table runner.

To make a block I've made a pdf project pattern available for free here.

I want to thank Tasha for asking me to be part of this blog hop and thank all of you for stopping by!

XOXO

Cristina

Wednesday, 10 June 2015

Hillside Houses Block 12


Well, here we are folks--the final block of the Hillside Houses QAL. This last block is super easy, and I think it's a good last block as a reward for all of the more complicated blocks in the patterns.


You can see my finished quilt above (thanks to the neighborhood kids!)--but I also wanted to show you two more finished quilts made by Kat. She didn't even wait for me to release the last pattern--she figured the last block out on her own!! Kat has been one of most tenacious and enthusiastic supporters of this QAL--she's starting a Halloween one too, and if you want to see everything else she makes, make sure to check her out on Instagram @katquilts.  


Aren't these AMAZING!!!

Also, I wanted to say a special thanks to my friend Christine of Triangles and Squares who reviewed some of the block patterns for me just hours before I was supposed to have them released!!! Thanks Christine!

To American Made Brand fabric, I need to give a special thanks for providing me all the fabric to make the quilt! It was my first time using AMB, and I'm so happy with the result!

And finally, thank you to all of you who have been so excited and encouraging about this project!! Please keep me posted on how your progress is going. Now I'm off to pack up the rest of my sewing stuff--the movers are coming tomorrow (anxiety!!).

To download Block 12 from Craftsy click here. If Craftsy doesn't work try the to download it from dropbox here.


Wednesday, 3 June 2015

Hillside Houses Blocks 10 and 11

Happy Wednesday everyone,

After today there will only be one block left for the Hillside Houses pattern--can you believe it's almost done already? I think time seems to move faster in the quilting world.

This week we are starting work on the sky and it can get a little confusing using all the different blues, so just keep that in mind.


I have been already planning out my next Hillside Houses quilt color combo. We have been packing up this week (and our first inspection is tomorrow!) and putting all my fabric into one place made me realize how many solids I have, so I think I want to make one with white roofs (suggestion of @katquilts, thanks Kat!) and make another one with prints. I just get so jealous every time I see what you guys are making.


Anyway, to get your PDF downloads of the Blocks 10 and 11 click here.

And I'll see you back here next week for our final block!


Sunday, 31 May 2015

Hillside House Block 8 And 9 Revision

Good morning everyone,

I just wanted to get the word out that I have revised the pattern for Blocks 8 & 9. Pages 2 & 3 of the pattern were in booklet format for some reason, and I have uploaded a new version so all the pages are separate and you don't have to squint when you try to read it:)

I also noticed that on page 3, the alternate assembly, that on Step 2, you should cut an E piece--not a D piece.


To download the newest version click here.

Have a wonderful weekend, and I'll see you in a few days!!


Wednesday, 27 May 2015

Hillside Houses QAL Blocks 8 & 9


Hello everyone. This week, as you might remember, blocks 8 & 9 can be pieced separately, or together. The difference is, if you piece them separately (as shown in the layout guide) House #13 will have an additional seam down the center of the left side. If you choose to piece them all at one time, the blocks will be pieced in two rows like this:


You can choose how you want to piece yours by downloading the pattern here. The third page will how you how to piece them as pictured above. The benefit to doing it that was is it just reduces the number of seams and pieces, but in reality, it is only the difference in two pieces! So it's really up to you to decide which way works best for you. I just hope that my instructions are helpful, and you are still enjoying yourself! If you have any questions, please let me know.

As for me, I have a confession. I did not get my blocks completed this week. My family and I went on a 4-day trip up to the beautiful Scottish Highlands. As you might know, we move back to America in about a month, and are trying to hit a couple of places in the UK that we might never get the opportunity to see again. I will write more about Scotland in a future post, but I just wanted to let you know that Scotland is by far the most beautiful place I have ever been.

I did also find some real Hillside Houses in England on the way up that I thought would be fun to share with you--


See you next week!


Wednesday, 20 May 2015

Hillside Houses QAL Block 6 & 7

I feel like I should explain this picture, lol. When I got off work today I rushed home to take a picture of my blocks and of course, it started raining and it was just too cloudy to get light anywhere, so I thought it would be cute if my kids held up the blocks. Well, they are cute, but not super excited about it:) I would also like to mention, that I have been having so many problems with my iron lately (the steam function has completely died), so if you have any recommendations for any irons you love, let me know!


If you're still coming back for more Hillside Houses then congrats on making it this far! We're over the hump now, and only have a few weeks left. I'm constantly impressed with the creative houses you guys are making, and I just wanted to say thank you to all of y'all. Thank you for making this quilt with me. Thank you for your enthusiasm, and thank you for your positive feedback. My inbox has a steady flow of email with questions, encouragement,  and kind words, and I just wanted to let you know how much it means to me.

I wanted to share with you some of my favorite comments/suggestions from this week, I had message from Debbie (#minersewfun) on Instagram and she mentioned that her husband calls this project "Monopoly Houses". It makes me laugh because it does look like Monopoly houses, and I struggled when I was trying to name the project. "Rooftops", "Ocean Front Property", "Mi Casa es Sue Casa", were some of the names I was throwing around, and when I asked my own husband what he thought his eyes just glazed over and he mumbled "uh huh". But anyway, I wish I would've thought of "Monopoly Houses", it's a cute, witty, and accurate. Thanks Debbie!

Another message that I got was from Kat (#katquilts) who mentioned that this would be fun as a Christmas quilt and don't you thin that such a great idea?! She recommended making it with white rooftops, and the whole idea just put me in the Christmas spirit.

Anyway, again, thank you for stopping by and playing along! You can link-up at the bottom if you want o show off all your progress!

Download Block 6 here.

Download Block 7 here.


Wednesday, 13 May 2015

Hillside Houses Block 4 and 5


Happy Wednesday everyone! Have you been checking out everyone houses in the QAL? I'm so amazed by all
the people participating, and the different versions being made. When I designed the pattern, I couldn't imagine it in anything but solids, but that just goes to show you how awesome it is to be part of such a creative community. There are several versions popping up with prints and they are just darling! It makes me want to make another one.

This week I have patterns ready for Block 4 and Block 5. These blocks are a little different because they aren't as tall, and Block 4 is slightly wider; whereas Block 5 is just smaller overall. I did this so we wouldn't have to cut House 6 in half (piece it in two different blocks with a seam-line going down the center of the front). When deciding the assembly, I wanted to avoid making the blocks in places that didn't fall within a natural seam line, but this will be a problem again in Blocks 8 and 9. No matter how you break the blocks up, one house will always have a seam somewhere where it shouldn't be--unless you break blocks 8 and 9 in two horizontal pieces but the problem with that is I wanted the layout and blocks to be pretty standardized across the board. Honestly having the additional seam won't be that noticeable to everyone else, but for all those OCD quilters out there (me included) we would know, and sometimes that is worse than anything else. Sometimes we can drive ourselves insane with the smallest things!

As a solution, and when the time comes (just two weeks), I'll have a alternate pattern ready to distribute--a combined block including 8 and 9, so you can piece it as one big block to avoid the seam problem:)

Anyway, thank you all for stopping by and I look forward to seeing your houses this week. Let me know if  you have any questions or feedback. Take care.


Tuesday, 12 May 2015

Sew Mama Sew Giveaway Day Winners

Thank you to everyone who stopped by for the Sew Mama Sew giveaway. It's always a fun time of year to see all the giveaways and watch the comments start rolling in. I had two bundles to give away, and the winners are:

Jayne who won the Hadley Bundle

and Barbara O. who won the Milk, Flower, Sugar bundle!


Congratulations ladies! I have emailed you, so reply back with your address so I can get those mailed out to you.  Thank you to everyone else who stopped by, and I wish I hope you guys were all able to win something somewhere during the giveaway days. Have a wonderful week!


Friday, 8 May 2015

Sew Mama Sew Giveaway Day!

Hi everyone! I've been so busy with the quilt-along that I almost forgot about Sew Mama Sew Giveaway Day!


If this is your first time stopping by then I'd like to welcome you. My name is Cristina, and I'm a quilter, mother of three, sweet tea drinker, and I can't decide if I'm a British person that just happened to be born in America, or a Texan that just happens to live in England. I am making a big move to D.C. this summer, so if you're in the Maryland/Virginia area, please give me a shout out! I'm trying to find out as much as I can before I get there : ) 

I started quilting a few years ago, and probably just like you, I fell in love. I have had lots of hobbies, but none of them really stuck until I started quilting. I think my style is a little bit eclectic--I love bold, modern quilts with colorful solids, but at the same time, I love quilts with super-sweet flowery fabrics. I have also developed a recent fascination with two-color quilts. I think I just love all quilts. 

I recently made this modern Aztec/Native American inspired quilt that was featured in Issue 21 of Love Patchwork and Quilting. My sister calls it the Jolly Rancher quilt...


And right now I'm hosting the Hillside Houses QAL, and we've just started, so I encourage you to check it out if you're interested. Each week I'll be releasing free block patterns to make this quilt:


There are 12 block in the quilt and you can see some of the participants progress on Instagram #hillsidehousesqal

So, now for the part you've probably stopped by for! Today I'll be giving away 12 Fat Quarters of Milk, Flower, Sugar by Elea Lutz and I'll be having a second giveaway of a bundle of Hadley fabric by Denyse Schmidt. 

You can enter three times, and here are the ways to do it:

1) Leave me a comment telling me which fabric you want

2) Follow my blog and leave a comment telling me which fabric you want:) If you're already a follower, just leave a comment letting me know. 

3) Follow me on instagram @prettylittlequilts and leave me a comment here letting me know you're following me and which fabric you want. 


Oh, and in case I didn't mention it, don't forget to tell me which fabric you want;)!! Also, leave me an email address if you are a no-reply blogger, or if you aren't sure if you're a no reply blogger.

I will randomly select the winners on 10 May 2015, so there's not a whole lot of time left!! I will ship internationally, so everyone can enter. Make sure to check out all the other giveaways on Sew Mama Sew! Thanks for stopping by everyone and have a happy weekend!!


Thursday, 7 May 2015

Hillside Houses QAL: Laying Out Your Blocks


Hi everyone! Okay, so I said I wouldn't bug you until next week, but I made a layout guide so you know how we're going to be placing the blocks. The quilt is made up of 12 blocks, and the quilt will be assembled in horizontal rows.

The quilt includes 18 houses, and each block pattern contains references to specific house numbers found on the coloring sheet.  I numbered the houses so that when you're making a confusing block you will know which colors go where.

As you can see, Block 1 contains House #1, but notice Block 8 contains houses #12, #9, parts of #13 and #16.


My patterns only focus on one block at-a-time, and I hope by doing it that way it will break up any confusion looking at all those crazy numbers might cause.

So far I have released patterns for Blocks one, two, and three, so you have everything you need to make the bottom row--1/4 quilt finished.

Please let me know if you have any questions, and you can download a PDF of the layout guide, or coloring sheet here.

Also, at the end of the QAL I will be compelling all these references into one PDF file, so if you don't have time to participate in the QAL now, you can get all the patterns and guides in one download in just one file.

I won't make any more promises that I'm not going to make any more posts for the rest of the week, so I'll just say I'll see you soon:)


Wednesday, 6 May 2015

Hillside Houses Blocks 2 and 3

Hi everyone! It's been pretty exciting because I've started seeing all of the Hillside Houses start popping up on Instagram. And for those who want to share, but don't have Instagram, I have added a link-up at the bottom so you can share what you've been making.


The good news is I have two block patterns available this week! I am going to try to continue the 2-block-a-week-trend until we're all done. You can download the newest blocks in my Craftsy storefront--Block 2 and Block 3.

Kylie at Faith Love Fabric suggested a blog button so I made one for you to post or share. This button will take you straight to a page that has everything you'll need for the QAL, and I'll have all the links for the patterns listed as the weeks go on.


Pretty Little Quilts Hillside Houses QAL


I also received some feedback from the talented Karen over at EasyPatchwork (whose block is appearing in Quiltmaker's 100 Blocks magazine!). She is making the mini Hillside Houses quilt and suggested using 2.25in HSTs and trimming them to size. I really appreciate her feedback, and am going to start adding that to all the patterns from here on out. I hope you all feel free to let me know anything you do or don't like because I want to make sure everyone is having a good experience:)! 

And now, I have some other news. It pains me to say this but today, as I was piecing my own quilt I discovered that when I initially wrote the fabric requirements for the large quilt (60" x 75") that I miscalculated the light gray (AMB 05) for the rooftops. I would like to apologize for those of you who ordered your fabric already, and I wanted you to know that I went back and checked every color again to ensure the fabric requirements were correct for the rest of the quilt. You will need 1 yd of light gray (instead of the 1/2 yard that I initially listed), and I have updated the page with the new information. I know shipping costs can get expensive, so I did some research and found an Etsy seller, LilacLaneLLC, that sells that color and will ship for only $2.00 in the States. If you were a victim of my terrible mistake, please send me an email and let me know!!! I'm terribly sorry.

I hope that didn't dampen the mood, and keep me posted on how you're doing! I'm having a lot of fun and I appreciate all you who've reached out to me. Enjoy your week, and I'll see you back here same time next week! P.S. Don't forget to link-up:)


Wednesday, 29 April 2015

Block 1 - Hillside House QAL

Hi everyone! Today I'm releasing the pattern for the first block of the #HillsideHousesQAL . This is House #1 on the coloring sheet.


To download the PDF of the pattern, click here.

Here's a few things to keep in mind when making your block:

1) The placement of this block is on the lower left in the empty space shown below.


2) The quilt has options for three different sizes. Don't get overwhelmed when you see the pattern, just stay in your lane and keep your eye on the prize!!

     a)  Throw size -  60" x 75"; the first block is 20" sq
     b)  Wall-hanging size - 30" x 37"; the first block is 10" sq
     c)  Mini - 15" x 18"; the first block is a tiny 5"

3) The coloring sheet has all the house numbers (addresses) on it, so it's a good reference to keep your pieces organized. I will refer to the house numbers on the pattern. The coloring sheet can be found here.

4) If you are making yours in different colors or arrangement, just take notice that I have used a dark shade on one side, and light shade of the same color on the other side of each house. I encourage you to make yours however you want, I just wanted to point that out in case it was difficult to tell. Don't feel obligated to make yours this way!!

5) Have fun. Have fun. HAVE FUN!!!

Let me know if you have any questions! I will release the next block pattern next Wednesday!


Sunday, 26 April 2015

American Made Brand Fabric Giveaway

Good morning everyone. I have a bundle of American Made Brand fabric to giveway on Instagram as part of the Hillside Houses QAL. If you do not have an IG account, you can leave me a comment here and I will enter you to win. Winner will be chosen on Tuesday and is open to anyone in or on planet Earth. Good luck!!!


Monday, 20 April 2015

Hillside Houses Coloring Sheet

Happy Monday again! I created this coloring sheet to use for the #HillsideHousesQAL to help you decide the placement of your colors if you're making it different than mine. It's also a good reference to use no matter how you decide to make it because it all the houses are numbered  and I'll be referring the numbers during the quilt-along. Enjoy!

To download a PDF copy, click here.

Hillside Houses Quilt-Along

Hello everyone! Today I just wanted to drop a couple of lines to announce an upcoming Instagram quilt along I'm hosting with a pattern I designed called "Hillside Houses". The QAL will begin on 1 May and I will be posting all of the instructions for free. The finished quilt measures 60" x 75" and it will be divided up into 12 blocks, and I will be releasing instructions for 2 blocks a week. The information will be Instagram but I'm also creating PDF printouts that you can download here for all the blocks for those of you who (like me) don't want to stare at a tiny screen to figure everything out. If you want to participate, or just follow along, use the hashtag #HillsideHousesQAL on IG. 

house quilt

I decided I wanted to use American Made Brand Fabric to make my quilt, because ever since I saw this pic of their booth at quilt market I wanted to try it out. Their fabric is 100% sourced and manufactured in the U.S., from the cotton farms to the dyeing process. I love the idea of using homegrown fabric.


Fabric Requirements:

This is a great project for using up your solids but if you decide you want to make yours exactly like I’m making mine here’s what you’ll need: 

1 yd light blue for left sides of blue houses and rooftops (AMB 87, Light Denim)
1 yd light gray for the right sides of rooftops  (AMB 05, Light Gray)

1/2 yard of the following colors: 

AMB 97 - Light Sky (for the sky)
AMB 05 - Light Gray (for right sides of rooftops)  
AMB 33 - Aqua
AMB 34 - Dark Aqua
AMB 23 - Light Olive (light green)
AMB 34 - Olive (dark green) 
AMB 90 - Blue 

Fat quarter of each of the following colors: 

AMB 75 - Dark Raspberry (dark pink)
AMB 43 -  Raspberry (medium pink)
AMB 36 - Orange
AMB 67 - Light Gold (light orange or dark yellow)
AMB 62 - Taupe
AMB 60 -  Dark Butter (beige)
AMB 08 - Light yellow (for windows). 

You’ll also need 1/2 yard for binding and 4yds for backing. 


I hope you'll follow along or join in the fun, and make sure to stop by instagram @prettylittlequilts on 25 April because I have a bundle of American Made Brand solids to giveaway!

Sunday, 12 April 2015

Button Up Quilt


Button Up Quilt

It feels like forever since I have been able to take a good picture of a quilt. I was very, very happy that the weather was nice today because I just finished up the binding on this one last night. We jumped in the car for a family outing in Thetford Forest and it was an awesome location for quilt pics. I always feel a little weird when taking quilt pics in public places because everyone stares at me like I'm a crazy person. There was a group of picnic-ers behind me gawking when I snapped this shot.

For this quilt I used Cluck Cluck Sew's Button Up pattern, and it's really a fun and easy top to put together. I'm very excited about this quilt because all the fabric was from my current stash. The yellows and greens in the quilt aren't consistent throughout but I was determined not to buy any new fabric for this project. I've been on a fabric fast lately, and am trying to use as much as I can before the big move.

button up quilt

The backing was actually a temporary-turned-permanent set of curtains in house that I made from Glamping gingham fabric. I felt like Scarlett O'Hara as I ripped those suckers down and used them to back the quilt. But I think the backing is perfect for a "country" look. According to my calculations, making this quilt was basically free because I was so resourceful with my current stash--and everyone knows that fabric purchased over 30 days ago doesn't count;)

Hope everyone else is enjoying the weather and is working on some fun projects. : )

Button Up Quilt

Saturday, 4 April 2015

Binding


For me, there's only one pro to binding a quilt with a sewing machine--it's quick. The cons, however, are endless. For starters, the process is completely stressful. Days before I even start the binding I'm trying to get myself mentally prepared. I practice lots of exercises in deep breathing, a little music therapy, and as the time to begin gets closer, a motivating counseling session with myself in the mirror isn't unheard of. 

After I've machine-sewn the binding to one side, I start to break out in a cold sweat, because I know it's about to get real. While I'm sewing the binding to the opposite side, I try to stare without blinking, because I know with one flinch my stitches will run up over the binding and all hope will be lost. It's very easy to mess up, and with all the time that is spent on a quilt, I don't want the last step to be the one that ruins it all. 

I've tried many, many different methods to make my machine-binding look as good as possible: sewing it to the front and folding-it over and sewing to the back, sewing it on the back and folding it over toward the front, sewing through the front and back at the same time, sewing it to one side and then folding it over and sewing through both sides. Time and again I've tried to make my machine binding look professional, but I'm almost never happy with it. So, I finally decided to do something different.

I started hand-sewing my binding. I avoided trying it for a long time because I thought it would take too much time. Of course, it takes ALOT longer, but I absolutely love it. There's no crazy talk in the mirror, no cold-sweats, no stressful sewing--just me and the quilt watching TV together. The process is completely relaxing, and it looks worlds better when it's all done. I might not hand-sew the binding on every quilt in the future, but if time allows, I think it definitely worth the extra effort.