photo q1_zpscd9da648.png  photo dot_zpsb8876eec.png  photo q2_zps95da3dae.png  photo dot_zpsb8876eec.png  photo q3_zps747c53f9.png  photo dot_zpsb8876eec.png  photo q6_zps32c3ba5d.png  photo dot_zpsb8876eec.png  photo q4_zpse6214d9c.png  photo dot_zpsb8876eec.png  photo q5_zps8a7bdd1d.png

Saturday 6 December 2014

A Quilt for Canaan + Kelly


I have been a terrible blogger lately, and for that I am very sorry. I recently started back to school, and homework + job + family does not leave me with much free time. Consequently, I've been behind way behind on blog posts. I did, however, want to show you some pics of a recent quilt I made and wedding I attended for a beautiful couple I'm lucky enough to know, Canaan and Kelly.


Photo courtesy of N. Barrett Photography

Canaan and Kelly met almost 10 years ago when Kelly was staying-the-night with my sister, Cayla. Kelly and Cayla were too young to drive, and they were walking around the neighborhood when they passed Canaan's grandma's house. Canaan was just visiting his grandma, and was outside when the two girls walked by. They all started talking, and from what Cayla told me, Kelly thought Canaan was so cute. Kelly and Canaan started dating after that, and now, almost a decade later, they are married.

At the wedding reception my sister Cayla met Canaan's sweet grandma who said, "Oh, you're Cayla! Your brother is Chad, right?" And his grandma went on to say, "Canaan and Chad were such good friends."

Confused, Cayla said "they were?" and was trying to remember if Chad and Canaan had ever even hung out.

"Oh yes! They were." Canaan's grandma replied. "They were always going to the movies together."

At that moment Canaan walked up and Cayla asked him, "were you and Chad friends?"

Canaan said, "Who's Chad?".

And I just have to laugh, because apparently Canaan was telling his grandma all those years ago that he was hanging-out with Chad, but he was really with Kelly. Poor Canaan's grandma! For years she has been thinking that Canaan was my brother's friend, but really he was using my brother as a pawn!

Kelly started off as best friend to my sister, but our family adopted her as "one of us" because we just love her so much, and now each of us claim her as a best friend. If you met her, you would want to be her best friend too:) She's beautiful, smart and genuinely just a really sweet person. Kelly is a Dallas photographer and when I was deployed for a year, she took photos of my son's first haircut, my daughter learning to tie her shoes, and she was there to greet me when I came home. I'll never be able to thank her enough for capturing the moments I missed while away from home.


Photo taken by Kelly Christine

Kelly was selected as D Magazine's "Best Family Photographer" and her work was recently featured in Mollie Makes magazine.  Kelly hinted to me over a year ago that she wanted a quilt, but Kelly is so trendy that I knew that I was going to have to go a little out of my comfort zone and make something a little more modern. Even though Kelly and I are friends I was nervous to make her a quilt. The only way I could see making a quilt for her was I had to imagine a quilt that I might see in one of her photographs.

I chose to make her a triangle pattern, and used colors I knew she was using in her wedding. I quilted it in straight lines, but the quilting was taking me so long, that it was only 75% complete when it was time for the wedding. I felt like a jerk showing up at the wedding with no gift, but I'm almost glad I saw the wedding before I gave her the quilt. I was so nervous she wouldn't like it, but after I saw the ceremony and reception I knew the quilt was going to be okay. After Kelly received the quilt, she assured me that they love it.


Photo taken by Kelly Christine

I wish I could describe to you how beautiful the wedding was, but there really are no words. Everything was perfect. Kelly was the most beautiful bride I had ever seen and tears instantly sprung into my eyes the moment I saw her. But the tears didn't stop with just how stunning she looked--I was an emotional mess the entire night because everything was really gorgeous. The ceremony was small and was located out on her grandparent's land. There was a beautiful lake in background and a log cabin on the grounds. There were sweet little things to see everywhere.

A pretty bike...

Photo courtesy of N. Barrett Photography
A painted chair...

Photo courtesy of N. Barrett Photography

And the cutest little girls that looked like dancing fairies...


Photo courtesy of N. Barrett Photography
After the ceremony, we headed over to the reception, and every detail was so well-thought out and beautiful. The reception took place in an old building turned art gallery, and couldn't have been more perfect. The tables were decorated so beautifully, and the FLOWERS! I really had never seen such beautiful arrangements. I was happy enough just to sit there forever.


Photo courtesy of N. Barrett Photography

Photo courtesy of N. Barrett Photography

Photo courtesy of N. Barrett photography


Photo courtesy of N. Barrett Photography


Photo courtesy of N. Barrett Photography
 Anyway, I just feel so blessed that I have such a wonderful friend, and I know her and Canaan really are going to live happily ever after.

Photo courtesy of N. Barrett Photography

To learn more about Kelly, and to see her work, you can visit her blog, Kelly Christine Photography

Most of the photos in this post were taken by N. Barrett Photography, and to see more of her beautiful work, you can visit her here.

Flowers were designed by Bows and Arrows Flowers

Cake and donuts were made by Cakewalk


Monday 10 November 2014

Around the World Blog Hop

Hi everyone. Today I'm taking part in the Around the World Blog Hop and I was asked by my friend, Cynthia of Dream Quilt Create, to participate. Cynthia has a wonderful blog, and if you haven't stopped to see it before, you should really go check it out. She makes the cutest stuff, and from what I can tell, she has the most romantic husband in the world who made-over her sewing room for her!

Another friend of mine, Shauna from lovinquiltin asked me a about a month ago to participate, but unfortunately we were on vacation and I wasn't able to do it. But I would feel bad if I didn't give a shout-out to Shauna! (Hi Shauna!)


P1020905


What am I currently working on?

Right now I have so many projects in the works I don't know which way is up or down. I think I have what is commonly known as QADD--Quilting Attention Deficit Disorder. That being said, I'm not making a whole lot of progress on anything. Do any of you do that?

But as for the big items, I'm working on a Union Jack Quilt for a friend, I'm testing a couple of patterns for some other friends, I'm working on a fall quilt (that is a little late coming along), and I have recently decided to participate in the #haveyourselfamerrylittlechristmas quilt-along on Instagram. I guess this is something that has been going on for a couple of weeks, but I didn't find out about it last night when my friend @AudreyAnn33 from Strawberry Island Studio asked me if I was playing. How did I miss this? Anyway, so I pulled some fabric today so I could get caught up. I really can't wait to get started.


P1020907


How does my work differ from others?

I don't know if my work really does differ from others because a lot of what I make is inspired by other people! If anything, I wish I could do what others do because I see so many beautiful quilts and think to myself, "Now why couldn't I come up with that?". I have quilt envy I guess.

But if there's something that I've learned about myself is that the biggest motivator for me is the meaning behind the quilt. And by that I mean, 'what does this quilt represent for me?'. Usually it's a memory or a connection to something that keeps me inspired to finish it. I start lots of projects, but I have a hard time seeing them through if I don't have an emotional connection to the design. Really, the projects I have been most passionate about are quilts that are inspired by people that I love, or places I've visited.

Why do I create?

I watched a documentary once called "Helvetica", and I remember the designer saying "Creativity is a disease for which there is no cure" and that really made sense to me. I think (probably like most crafters/artists) I create because it's just something that I have to do. Sometimes creating isn't always a stress-reliever because I become obsessed with an idea, and then I can't focus on anything else until I've made it. And then there are other times, when I have absolutely no new ideas, but even then I start to become really anxious if I'm not working on something, because I feel like it's just something I need to be doing.

How do I work?

I looked at this question in two different ways, so I'll go ahead and answer both.

I think my creative process is a little inconsistent. Sometimes I have an idea the develops slowly, and then I might draw it out and carefully pick out fabric. And then there are those other times, when an idea blasts me out of my sleep and I just start making stuff when I'm not really sure how it's all going to work out.

As for where I work, I am very, very fortunate to have a small sewing room, and to be honest right now, it's completely out-of-control. So, much of my time has been spent trying to get it organized and decorated properly. Hopefully soon, I'll be able to share some before and after photos. The photo below is somewhere in between before and after and is the only picture I could take that wouldn't send you into cardiac arrest : )


P1020894


And as for my machine, I sew on a Bernina Patchwork 350 and I absolutely love it! I saved up for two years after sewing on a Singer Simple, and now I'm a Bernina fan for life. Before Bernina I didn't know that fabric wasn't supposed to be eaten by the machine! It has been a lifesaver for me.


P1020833


Anyway, that's all for my portion of the Around the World Blog Hop. I know my answers aren't all that thrilling, but I appreciate you stopping by!! Next I'm tagging Melissa from My Fabric Relish and Audrey from Strawberry Island Studio--and now I just need to go tell them. Haha.


Saturday 25 October 2014

Moda Spell it with Fabric

P1020862

I'm so happy to post this today because it seems like it has been forever since I've had a finish to show you! This one took me awhile because I kept changing my mind about what colors I wanted to use. When it was all said and done I think I made about 40 letter/blocks, so I have almost enough for a second quilt. I want this quilt to be the one that is on my sofa everyday, so I just quilted it in a wavy line stitch, which makes it soft and drapes really well.

I used the Moda Spell it With Fabric pattern, and at one time it was available for free, but now I can't find the original posts for you, but if you want to purchase it, you can do that here.

P1020870

Although I had wanted to make this quilt for a while, I was only really inspired to get started during the summer when my daughter and I were spending much of our time reading together. My daughter really struggled with reading, and did not enjoy it at all. It baffled me at first, because she is such a bright child, but it seemed like it was just never clicking for her. For her entire second grade year she went to additional tutoring every day, but not much progress was made, and her reading level was that of an early first grader. Her Lexile score (tests used to determine reading level) was at a 167 and for a beginning 3rd grader it should be at 500--so we had only a few months to get her where she needed to be. I was worrying myself to death about it. It's not that I wanted her to be the smartest kid in school, but I don't want her to lose confidence in herself if she was behind. Mostly, I just wanted her to love reading, because there's so much enjoyment to be found in books.

P1020887

At the end of the school year, her teacher sent home a recommended summer reading list that were appropriate for her reading level. The list had books like "Clifford the Big Red Dog" and other books that I felt were never going to help her progress. Those books only have about 14 words in them and although they might be appropriate for her reading level, they are not suited for her age level. So I went online and started buying books that I remembered loving at her age. When the books arrived, we started slowly making our way through them. At first it was really slow, but even if we only read a half-page in 20 minutes then I was okay with that. I just wanted her to read enough to where she would fall in love with story, which I hoped would motivate her enough to keep reading. And then it happened. We where reading "The Chocolate Touch" and she thought the story was so funny she didn't want to stop reading! Chapter after chapter we just kept reading, and when I was ready to stop, she finished it on her own.

P1020871

We read four chapter books over the summer--over 600 pages of words. It might not seem like a lot for some children, but for us, it was a great achievement. When it was time for her to start school again I was so nervous about her next reading-level test and kept pestering her about when they were going to take it. Then, one afternoon, a couple of weeks after school started, she called me at work and said "Mom, I took the test today and I scored a 499!". Well you can imagine, I was ecstatic, and I started crying tears of happiness, and even as I write this tears are springing into my eyes! I am just so proud of her I can hardly stand it, and this quilt will always help me remember this awesome achievement.

P1020881

I must admit, I imagine her at her high school graduation, standing up at the podium to give the Valedictorian speech, and she says, "...and this would not be possible without the support and guidance of my greatest teacher--my mother."

But my fantasy about the future is broken with the sound of her saying (in real life), "Mom, can you pleeeaase microwave me some bagel bites?"

P1020884


Have a great week everyone!


Linking up at My Quilt Infatuation for Needle and Thread Thursday!


Sunday 19 October 2014

Love Patchwork and Quilting: The Magazine with Heart

If you've been following me on Instagram, you might have noticed that I recently had some super-exciting news to share. Many months ago, I submitted a quilt design to Love Patchwork and Quilting. I was ecstatic to find out that the design was accepted, and then shocked when I found out my quilt made the cover!!

image courtesy of Love Patchwork and Quilting

The funny thing is, the quilt you see in the photos was not even the original quilt design I submitted. This was actually an alternate design I sent to the editor, Jenny Fox-Proverbs, when the first quilt didn't work out. Yes, you heard it right. The first quilt I was supposed to make for them was a total fail and the fact that Jenny even gave me another chance is nothing short of amazing. Later Jenny told me that it was probably all meant to be and I think that she's probably right.


image courtesy of Love Patchwork and Quilting

Originally,  I was supposed to make a lone star quilt with Anna Maria Horner's fabric, Pretty Potent. I made that quilt, and when it was all together I realized something.  IT WAS UGLY. Horrendously ugly. In the planning phases I made a mini version that turned out beautifully, but when all those prints and diamonds were enlarged for the big version it somehow changed and ended up looking like a trashy jungle quilt out of a quilting nightmare. I couldn't send that quilt to them, and my deadline was coming up, and after a few days of panic, I finally emailed Jenny and told her the terrible news. I assumed that my quilting career was over and I would have to shut down my blog and go into hiding, but Jenny did something crazy. She gave me another chance. I'll never understand it.


I heard her say once that she thought of her contributors as her children, and since she's not old enough to be my mother I'll just think of her as my fairy godmother. Because really, she could've let me fall on my face, but she didn't. She was understanding and believed in me, even when I was having a hard time believing in myself. Her and her amazing team walked me through the process with kindness and encouragement and I'll forever be grateful to them. Thank you so much Jenny, Alice and Lin!!

Quilt details: Chevron Snowflake, 80" x 80", Issue 14, Love Patchwork and Quilting

Next week I'll be doing a giveaway with the copy of the magazine and a few other items, but if you want to order one now, you can do that here.


Monday 8 September 2014

Lovely, Lovely Lone Stars: The Basic Star Tutorial

Lone Star Tutorial

I LOVE lone stars. I love everything about them--their history, the challenge of putting them together, and the stunning beauty of the finished design. When I'm in a sewing rut, or bored with other projects, I always find myself being drawn back into making lone stars. And no matter how many times I've made them, it never gets boring, and I'm always discovering some new technique that works (or doesn't work) for me. Earlier this year I made my Exploding Lone Star, and promised a few people that I would post a tutorial, but I thought it was important that I cover the basics of lone star making first. I have had my share of panic and hysteria during the learning phase of working with diamonds--bursting into tears, ready to scream and pull my hair out, and imagining throwing my quilt into the garbage disposal, then laughing maniacally about it. And then, after I regained my sanity and finished the project, I found it truly a rewarding experience. My love for them is much like romantic love--it can make me blissfully happy, but at the same time, has caused me a tremendous amount of turmoil.

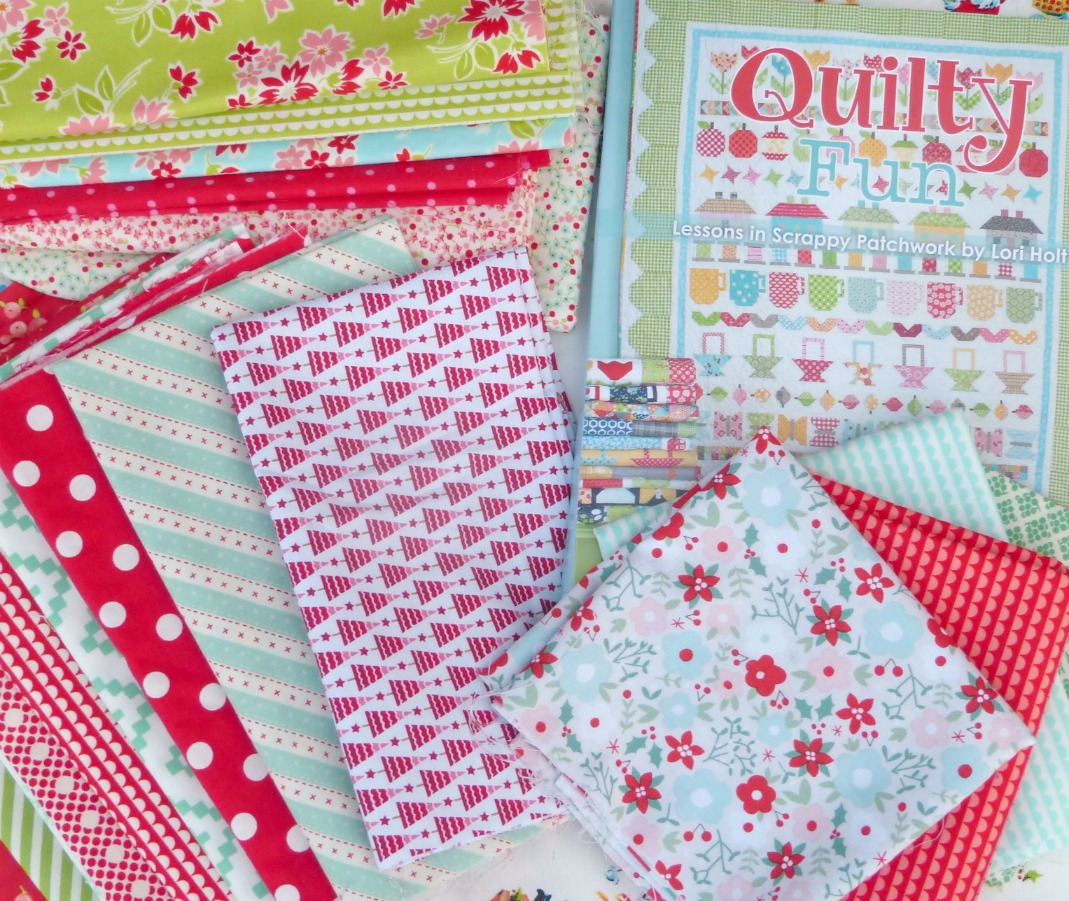
There are many wonderful resources available to learn how to make a lone star quilt, and I encourage you to explore as many avenues as possible to learn what methods you like and what tutorials you find work best for you. I used a combination of books, blog tutorials, and videos to learn as much as I could, but the when I encountered problems, there didn't seem to be any guidance on what I could do to fix them or prevent the same problems from occurring again. It seemed like I was running into the same issues over and over again, and even though there is a spreading rumor that "lone stars are difficult", I didn't feel like there was a place to go to find help to questions like "what's the best way to iron diamonds?" or "what do I do if my quilt bows up in the middle?". It seems like many of the tutorials I read provided excellent steps for the process, and provided perfectly-pieced finished quilts, but I was left wondering if the author had experienced any of the frustrations I was experiencing, or was I really just an idiot with a sewing machine? Were the creators of lone star tutorials struggling behind the scenes, or was the process for them just as simple as it appeared to be? I hope through my tutorials, I can try to answer some of these questions I have asked myself and to pass on some of the things I've learned, so that you can experience the joy and beauty of making a lone star, without getting admitted to a psychiatric hospital.

Constructing a Lone Star

Like many traditional quilt designs, a Lone Star has many names: Bethlehem Star, Morning Star, Star of David, and if you're on instagram, you can find lots of lone star quilts named simply #starquilts. Typically, lone star quilts are made of a single star burst, but it's also very common to find quilts made of several mini-stars. Each is 8-pointed and made of 45 degree diamonds. Traditionally, lone stars were pieced with Y-seams, but somewhere along the way a very smart person realized there was a much easier way to piece the star. In fact, you'd have a hard time finding a tutorial that DOES use Y-seams. Now the most common method is strip piecing.

To strip piece a lone star, strips of fabric are sewn together, and then cut on a 45 degree angle to make a strip of diamonds. You sew the strips together to make a larger diamond which becomes one "arm" of the star. The arms are pieced by sewing the strips of diamonds together, as you'll see in the tutorial. Strip piecing is a much easier and faster way to construct the star, and it really is a lot of fun. You just want to make sure you cut and piece as accurately as possible. Working with bias cut pieces can be tricky, so don't get frustrated if everything doesn't go together perfectly. Just have fun, and if you find yourself wanting to rip phone books in half with your bare hands, then remember, I'm here to help! Shoot me an email, and you can gripe at me, and I'll do the best I can to help in any way possible--even if it just means sending you a bottle of the best over-the-counter drugs money can buy:)


The tutorial today will make a 20" x 20" star block.


What you'll need: 

For the star:
Color A - 1 - 2.5" x WOF
Color B - 2 - 2.5" x WOF
Color C - 1 - 2.5" x WOF

Background:
1 - 7.5" x WOF
  * Subcut into
     2 - 7.5" squares
     4 - 7" squares


Making your strip sets: 

Sew B to the top of A, staggering it approximately 2.5" from the end of A. Carefully, press towards B.


Now do the same thing with strips C and B. Sew C to the top-side of B, approximately 2.5" from the end. Carefully press towards B. Your strips should look like this--


Flip your strips over and align the 45 degree angle of your ruler with the top of your strips, and use your rotary blade to trim off end. 


Flip your strip back over, align the top on the 45 degree angle, and measure 2.5" inches on the angle--make sure to keep the left side of your strips lined up the 2.5" line of your ruler.  Use your rotary blade to cut your first strip piece. 


Following the same method as above, continue cutting strip pieces until you have 8 (AB) diamond sets. Repeat with the (BC) strip set. 


 At this point you should have 8 each of (AB) and (BC) diamond strip sets. 

Making the arms of the star:

Arrange 1 (AB) and 1 (BC) diamond strip as shown below.


Using the photo below as a guide, draw dots on each of your strips where the two diamonds meet. 


Now fold one over so they are right sides together. 


Pin directly through each of the drawn dots 


and then secure pin in place. Notice there is a 1/4" end point of fabric showing from the bottom strip set--this is a good thing and should look this way on both ends. 


Align the needle of your sewing machine at the intersection of the two strip sets (where the fabric tip is exposed) and sew a 1/4" seam.   


Sew slowly and do your best to sew directly over the point where the pin was pushed through the drawn dots.


Now when you open it up you should have perfect points.


If you don't have perfect points (happens to me about 25% of the time) and it bothers you, you can carefully unpick and try again. Be very careful when unpicking--if you tug the fabric too much it can distort your diamonds. However, when making lone stars one of your best friends is your seam ripper--don't feel any shame in using it!!

Once you have it sewn together to your satisfaction, carefully press your seam open on the backside. I use only the very tip of my iron, and it barely touches my fabric. I just want to have it pressed good enough where the diamond doesn't fold closed on me. I always make sure that my iron doesn't touch the end points of my "arm" or diamond because things can get all crazy if your ends get distorted. Then I flip the diamond over, and press once (without moving my iron back and forth) for a few seconds over the middle of the diamond--again being as careful as possible NOT to touch the top and bottom points of my "arm".


When your arm is together you can trim the points off (below) where you sewed your seam. You don't have to do this, but it will help reduce bulky seams later. 


Repeat to make 8 "arms" and then decide how you want them arranged.


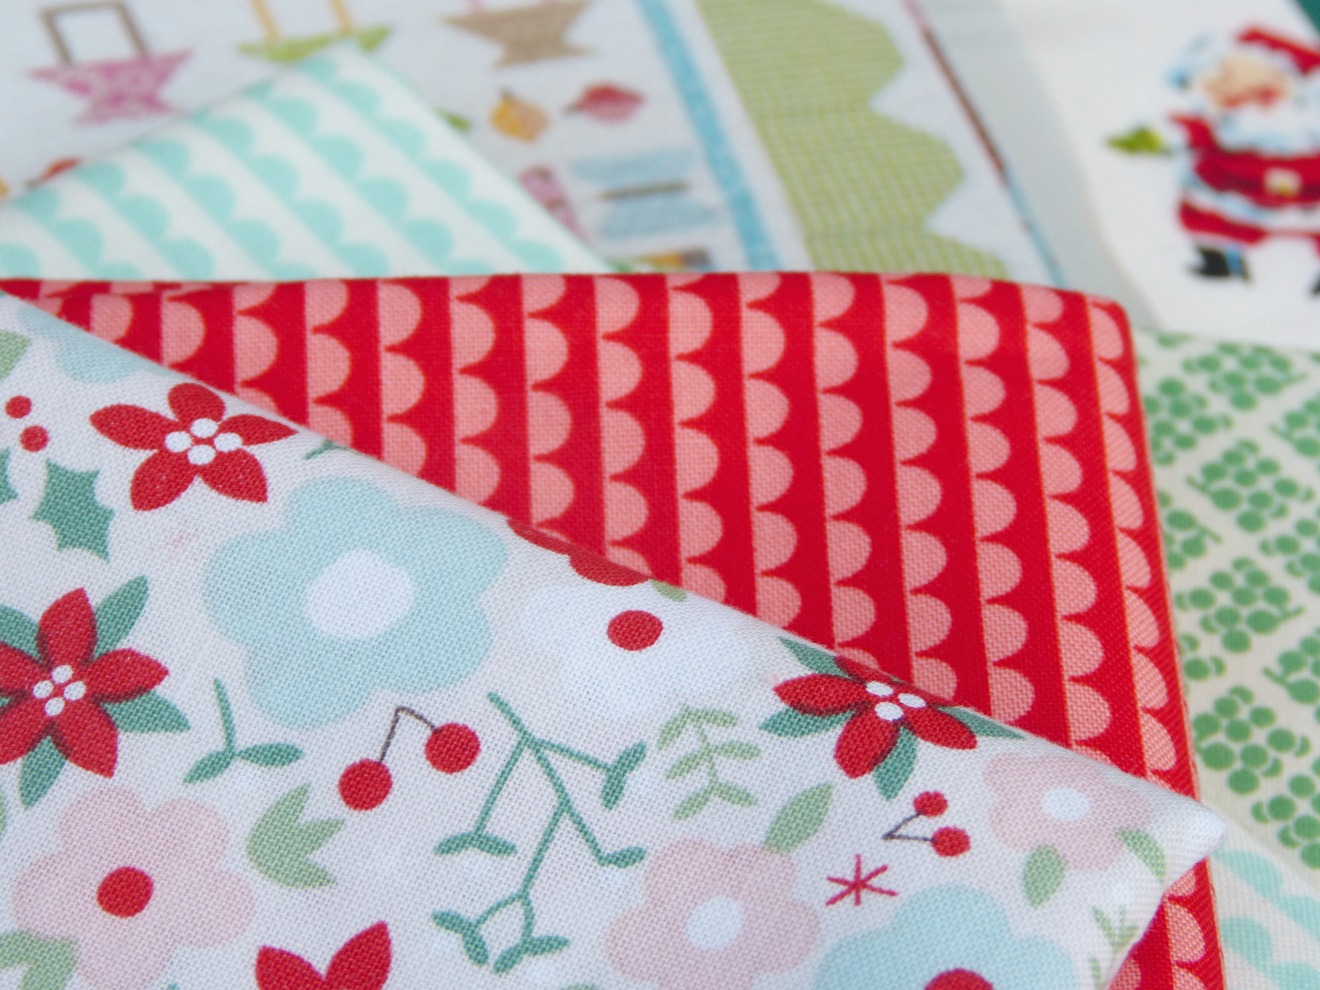
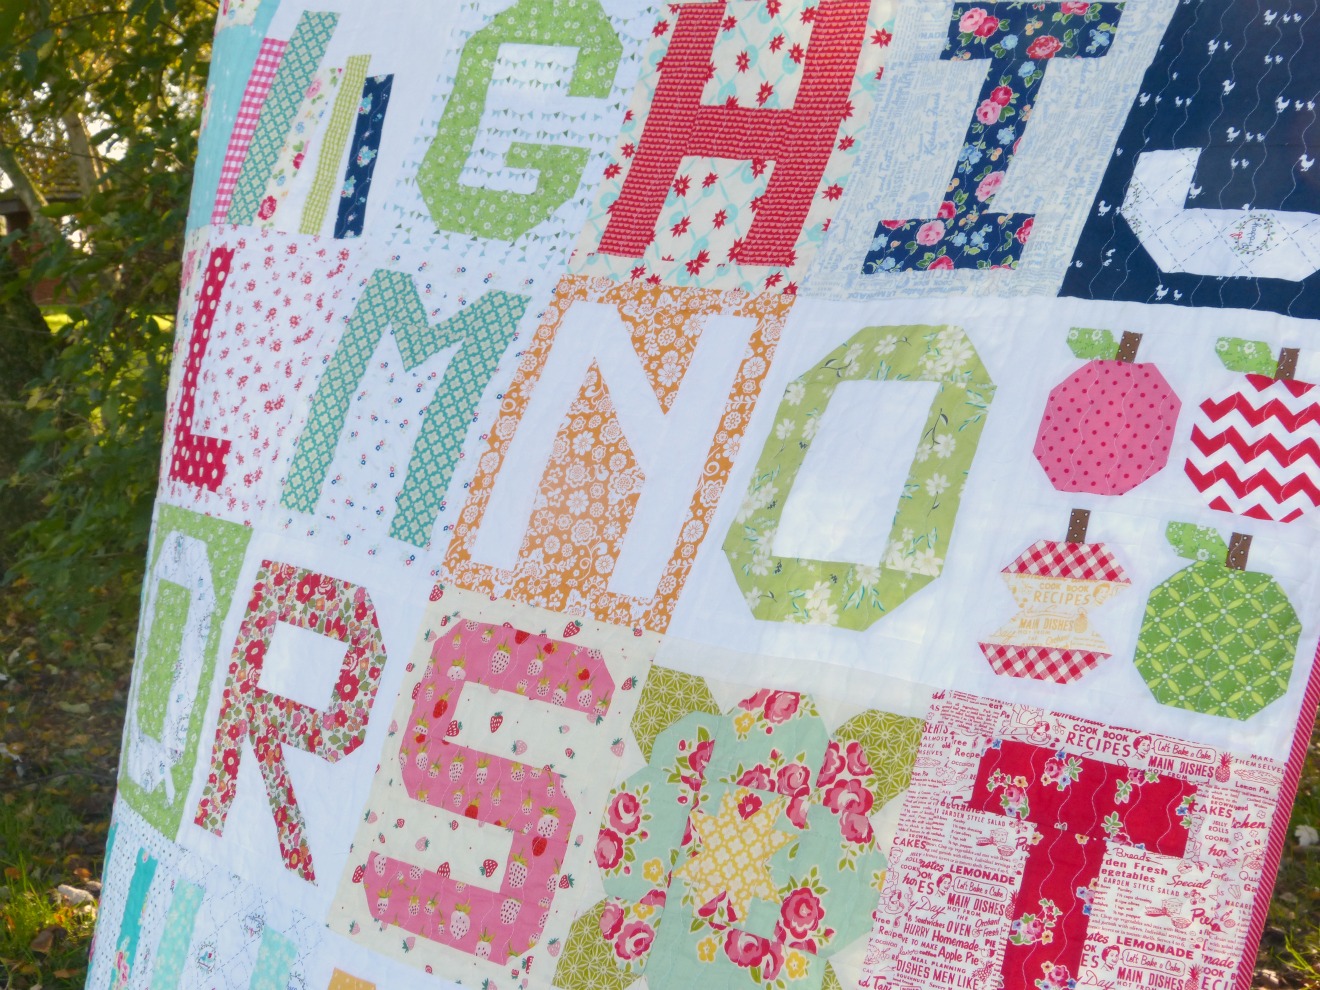
Note: I couldn't decide if I wanted the aqua in the middle or the white floral, so in the end I chose to alternate every other one (see picture at the very top).

Adding the background:

The background is made from using half-square triangles (HSTs) and quarter square-triangles.

Cut 4 - 7" squares in half diagonally and set aside.


Cut 2 - 7.5" squares in half diagonally, and then, being carefully not to move the square, cut it in half diagonally in the other direction (below) and set aside.


The background will be added to the star one quadrant at the time. First, lay out two of your "arms". Then arrange two 7" HSTs in the upper right corner (with diagonals in the center to make it look like a square). Add a quarter-square triangle to the upper left and lower right of the "quadrant" with the longest edges facing the inside of the quadrant next to the "arm".


Next, fold down a HST and sew it to the arm. Just like when sewing diamonds together, leave 1/4" of the end of the HST to extend past your diamond. After it is sewn on, trim the point that extends past the diamond.


Press towards the HST. If you're using a light background and making a dark colored star, you can press open or towards the star. 


Next, sew the HST onto the arm on the left. Then, using the same method, sew your quarter-square triangles to the arms as pictured below. Make sure the triangles extend 1/4" past the diamonds. Press towards triangles.


It always helps if you have a pretty girl helping you out.


Fold the two halves RST and pin the seams so they match up. Sew them together and press seam open.


Notice on the intersection where my background fabric meets up at the outer point of the diamond--it only met up exactly about 50% of the time. But don't worry--we'll fix this when we square up our block. The seam ripper in the photo below is deceiving--for this problem you don't need to fix anything right now. 


The next part might not be essential for a lone star this small, but it does become extremely important if you're making a large lone star with lots of rows of color. Sometimes, unfortunately, when you sew your entire lone star together you might have a hump where it bows up in the very center of the star. In order to prevent this from happening, I always make sure my quadrants are have a perfect 90 degree angle on the side where the center of the star will be. Once you've squared your quadrant, repeat the above steps to make 4 total.


Assembling and squaring-up your block:


Sew two sets of two quadrants together and press seams open. Sew the two halves together and press open to make the completed star.


Use your ruler to square up your quilt. I used the points of the star as my guide, matching the points up to the 1/2" mark on my ruler, and trimmed off the excess.  Finishes at 20" x 20". 


And now you're done! I hope this tutorial helps you out, and if you have any feedback, please let me know.