


Good morning everyone. First off, I would just like to say "THANK YOU" to everyone who reads this blog and listens to my long-winded stories. You don't know know how much your support and encouragement means to me. I know my quilts aren't perfect, so thank you so much for your interest in what I do.
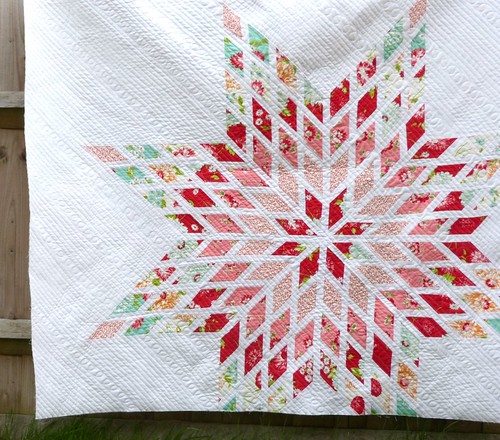
I'm not going to torture you with a long-winded story today (but it was my original plan!). I just wanted to show you some progress I've made on a recent creation--the Exploding Star. I got the inspiration for this from a pic I saw on instagram and then the idea of making it consumed me. I think I started this over a month ago, but it took so long to get to this point that it put me behind on several projects I should have already finished (sorry Audrey!).
When I put this star together the FIRST TIME, it would not lie flat...the more pieces, ironing and handling will really start to distort your star. The center had a "hump" and I had intended to completely start over but I didn't want to waste all the fabric. I took it apart, "fixed" the angles, and reassembled it. I am SO happy I did.
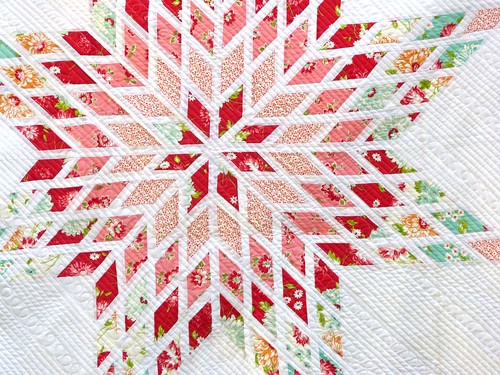
I quilted it in diagonal straight lines, and occasionally added a row of loops. I like how it looks around the star, but now I wish I would've done something different inside the star. And I still haven't decided on what binding to use...I want to hang this in the living room and I'm not sure I want anything colorful around the edges to draw the eye away from the star.
I have had several people ask how I made this, so my plan is to write a tutorial as soon as I get caught up on a few other projects. I feel like this star was a huge undertaking in the beginning (when I wasn't sure what do to), but after remaking it twice I don't have any inhibitions about making another one and showing others the process. I'm actually really looking forward to it.

Anyway, thank you again and I hope you have a great week!
Linking up with Fabric Tuesday on Quilt Story!!
I look foreword to you tutorial! It's stunning!!
ReplyDeleteChristina, I think this is absolutely beautiful. And I think the quilting is just perfect - the odd rows of loops just work for me! They add this lovely softness. Would you want to bind in white? White on quilts scares me, because I tend to be a bit grubby, but I can't picture this with a hot pink trim ;-)
ReplyDeleteE xx
I love stars I LOve This!
ReplyDeleteFan-freaking-tastic! This is so beautiful!
ReplyDeleteI am so impressed with the amount of sewing and quilting you do, and the amazing skills you have! This star is just too wonderful for words. Seriously beautiful!
Ohhhh, a thought about binding. Have you ever used a faux piping binding? or even a flange (I think that's the name). I'd love to see the faux piping/flange be made from scraps of the diamonds -- it gives just a tiny bit of color/movement to the edge of the quilt without an abrupt change (if you used a color/s for regular binding). It's a little more work than regular binding, too, but so totally worth it!
ReplyDeleteAbsolutely Love this! I cannot wait for the toot.
ReplyDeleteWow! Impressive and stunning! I love the quilting you chose to do. The odd row of loops sure adds interest. Well done and beautiful!!
ReplyDeleteThis is gorgeous!! It's beautiful and you can see how much work this took!
ReplyDeleteThis is gorgeous!! It's beautiful and you can see how much work this took!
ReplyDeleteUm, freaking stunning. I bow to your ingenuity. Seriously. I just do what others have done, but you create beauty. Well done.
ReplyDeleteWhat an amazing quilt! I love your quilting. Very stunning.
ReplyDeletewow - love this quilt! I agree that a colored binding would take away from the quilt - hope that you have more of the white fabric that you used throughout the quilt.
ReplyDeleteLove the look of your exploded star. I've done the Lone Star once and thought "never again" ... but I think you may have changed my mind!
ReplyDeleteA very beautiful quilt and your quilting is just as lovely...very much an heirloom!
ReplyDeleteIt is beautiful. Just like you.
ReplyDeletelove your quilt!! it is stunning and the fabrics are perfect
ReplyDeleteAbsolutely stunning, just fabulous :D
ReplyDeleteLove your stories, love your quilts, and this one...breathtaking! You always pick the prettiest colors and sew them up amazingly!
ReplyDeleteOh this is really beautiful!!
ReplyDeleteOH MY GOD Christina, this is BEAUTIFUL!! I don't know how I keep missing these posts. I came here to get your email address and this popped up, wow! I love, love love it! You truly don't know how talented you are!!
ReplyDeleteMy first real (well it's not great but..) quilt I used white binding. I was wrapped up in it the other day and was looking at it. I wondered why I never thought to use white binding again because I really love it. That may be good here if you want the attention to the star. But whatever you choose will not take away from the beauty of this one!
ReplyDeleteThe quilt is amazing! No wonder it didn't sit flat to begin with. It's such a difficult pattern, but you've done a great job with your re sewing.
ReplyDeleteAwesome quilt. Yes, please, a tutorial!! This quilt is too beautiful not to share with us.
ReplyDeleteI will be looking forward to your tutorial! Your quilt is beautiful ! Thank you for following your creativity and then sharing it!
ReplyDeleteI can't wait for your tutorial! Or a paid pattern, just get it out here for us! ☺
ReplyDelete